
From Cute Leafy Faces to Gloopy Hallowe’en Horrors, here’s my honest guide to some crafts to occupy little ones for a few hours on a rainy day this October half term
17 October 2023

My mum was a proper Crafty McCraftface. She’s pretty humble about it, but she was bloody amazing at doing stuff with us growing up. My dolls and I often had matching home made outfits! Super cute, but I do wonder where she found the time.
Though to be fair she was a stay at home mum so I guess she had one less (fairly large) plate than I have to juggle.
So maybe it’s in the blood, as I’m ALL about the crafting and creating too. But I’m also a little short of time these days. I don’t miss corporate life AT ALL, but it did mean that I could clock off at 5pm full of unused creative energy and spend all my spare time making stuff. Now that I create for a job, and love it so much that I pretty much think about it 24/7 – I do find I have a lot of half finished crafting projects, and ALL the unused tools and gadgets that you can imagine.
The kids love to craft and make (do all kids, maybe?) so they don’t need to be asked twice to embark on some project or other, and it’s a good way to connect with them, and keep them off their screens for at least a while.

As you know, I like to keep it real, so here is my honest guide to a few crafty things we got up to last year. The process is always very photogenic, even if the output sometimes looks a bit like a dog’s dinner 🙂 And creating a memory of the time spent doing it is what I’m actually aiming for rather than Instagram worthy perfection. Which is just as well, as you will see:
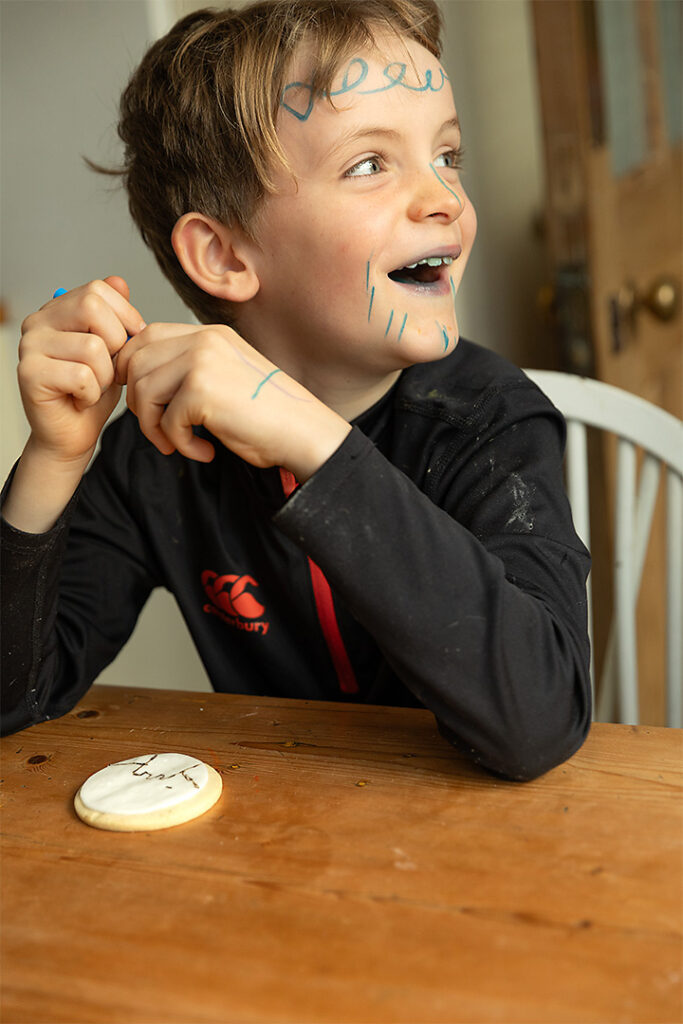
1. Drawing spooky scenes on cookies
Essential Kit
- Biscuits
- Fondant Icing
- Cake Pens – I got mine from Morrisons

This one is one of the more successful and one we do at different times of the year with different themes. If you can’t be bothered to bake the biscuits, or aren’t any good at that kind of shizz, then just buy some. Ideally totally flat ones and not too sweet as the icing is really sweet. Something like a rich tea is perfect. I usually use a sugar biscuit recipe from the Hummingbird Bakery recipe book, though I cut down the sugar quite a lot and they still work. Roll out some white fondant icing to around 2mm thick, and cut circles the same size as your biscuits and stick them on top with edible glue. Get a coffee, and let the kids go crazy with whatever spooky design they like, and fight over who has the orange pen.
Top Tips
- Leave them to dry for a few hours otherwise the pen nibs will sink into the icing.
- Use a glass if you don’t have a cookie cutter.
- You can make edible glue yourself out of the icing you already have: Take little ball of fondant about the size of a Malteser add about 1/4 tsp of water, and microwave it for about 10-15secs in a microwave safe bowl. Whisk it up with a fork and then paint it on either the icing or the biscuit and stick them together.
- The homemade glue It will only stay liquid for a while so don’t hang around!
Scores on the Doors
| Fun: | 10/10 |
| Nice and Easy to set up: | 5/10 |
| Not Much Mess: | 10/10 |
| Looks Good: | 10/10 |
| Not too much Fighting: | 5/10 |
| Keeps them Occupied for ages: | 10/10 |
| Not much parent help required: | 8/10** |
** none once the biscuits are done!

2. Making Glue Ghosts
Essential Kit
- PVA glue
- Googly Eyes
- Needle and thread
- Greaseproof Paper
- A flat surface like a baking tray
- Patience

This one looks sooooo good on Insta. Or at least everyone else’s attempts seem to. Ours looked just a little more sh*t, but the kids really enjoyed making them so there’s that…!
They are (in theory) very simple to make… You just lay out the paper on the flat tray, and then squeeze out the PVA glue in a ghostly shape. Pop the googly eyes on and leave it to dry, before attaching a thread somewhere near the top (using the needle, obvs!)
Top Tips
- Make sure your surface is REALLY flat as otherwise the PVA will go where you don’t intend it to.
- Make sure they are quite spread out as otherwise you’ll just have one really fat ghost.
- Start them at least a week before Hallowe’en. Maybe my house is just damp but they took forever to dry!!
- Let go of any idea of perfection 🙂
- One glue bottle per child to avoid fighting
Scores on the Doors
| Fun: | 10/10 |
| Nice and Easy to set up: | 3/10 |
| Not Much Mess: | 1/10 |
| Looks Good: | 5/10 |
| Not too much Fighting: | 10/10 |
| Keeps them Occupied for ages: | 5/10 |
| Not much parent help required: | 1/10** |
** unless you don’t mind your house being covered in glue


a bit sh*tter than I imagined…
3. Bouncing Spiders
Essential Kit
- Black card
- Scissors
- Glue
- Googly Eyes
- Elastic string, ideally black
- Something like a hole punch or a skewer to make a small hole

I went wrong on this one and tried to make them with felt and pipe cleaners – they looked really nice at first but the glue didn’t really want to stick them and the poor spiders ended up falling apart after we hung them up – definitely just use card instead. Cut 2 small matching circles of the card out per spider (I used a shot glass to mark the circles). Cut 4 long thin strips of card per spider. About 1/2cm wide, and long enough to cover the circles and stick out each side by about 2cm. Put the glue on one of the circles, lay out the legs (symmetrically if you can) and stick them down on the glued circle. Glue up the 2nd circle, and pop it on the top. Glue on the googly eyes. When they’re dry, make a little hole and thread the elastic through and knot it.
Top Tips
- You can thread them up on a string if you like, to make a sort of bunting.
- Let them dry before hanging them, so they don’t fall apart!
Scores on the Doors
| Fun: | 10/10 |
| Nice and Easy to set up: | 5/10 |
| Not Much Mess: | 6/10 |
| Looks Good: | 10/10** |
| Not too much Fighting: | 10/10 |
| Keeps them Occupied for ages: | 5/10 |
| Not much parent help required: | 1/10 |
** if yours don’t fall apart!

4. Leafy Friends
Essential Kit
- Autumn Leaves
- PVA glue
- Googly Eyes

Go for a walk and gather the leaves. Get some pics of them jumping in the leaves while you’re out there 🙂
If they don’t turn out how your were hoping, give me a call for an Autumn Shoot! 🙂
Simply stick the googly eyes on the leaves… And done! Ours got named and played with, pretty cute.
Top Tips
- Get nice fresh leaves before they go all dry and crispy
Scores on the Doors
| Fun: | 10/10 |
| Nice and Easy to set up: | 10/10 |
| Not Much Mess: | 10/10 |
| Looks Good: | 10/10 |
| Not too much Fighting: | 10/10 |
| Keeps them Occupied for ages: | 3/10 |
| Not much parent help required: | 10/10 |

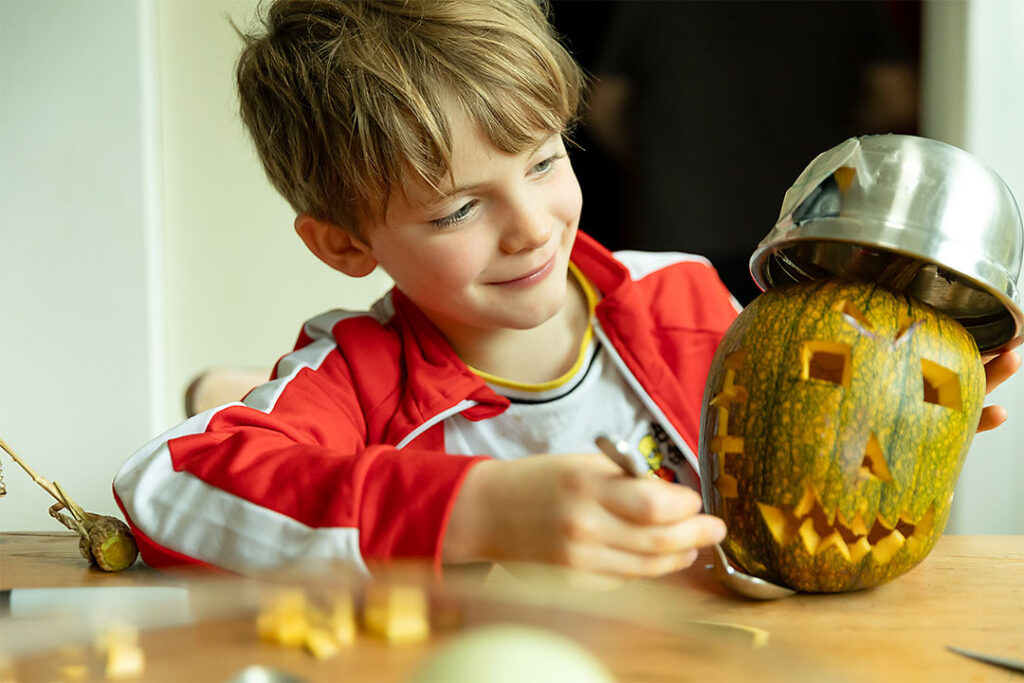
5. Pumpkin Carving (and Eating)
Essential Kit
- A pumpkin 🙂
- A pumpkin carving set or a perilously sharp knife
- Lots of bowls
- A Sharpie
Sigh… This always seems like *such* a good idea. My oldest now insists that it’s a tradition and we HAVE to do it. But to be honest I might rather chop up the damn things and put them in a pie 🙂
I’m not sure this really needs instructions but just in case:
Get your sharp knife and cut a nice big circle around the stalk off the pumpkin, remove it and all the seeds and fibres. Scoop the seeds in one of the bowls and scoop out as much of the flesh as you can and save this too. You can get special scoopy things (Waitrose have them at the moment) but I usually use a melon baller.
Get the kids to draw their spooky faces on the pumpkin with a sharpie. Make sure they draw something that you can cut out easily – so straight lines are very much easier than curves, and make sure there’s nothing that will be unsupported after you cut it – gravity, you know… Try to avoid taking over if their version looks a bit rubbish.
Kind of obvious, but you do the cutting if the kids are small 🙂
Top Tips
- The most important thing is to treat it to stop it rotting – spooky is all very well but a decaying caved-in face on your windowsill is maybe a spook too far. I usually dunk mine in bleachy water, and one year I also smeared the inside with Vaseline, which worked quite well, but used up quite a lot of Vaseline.
- Don’t even thing about wasting the seeds! Wash them so that there is no gunk and fibre on them, dry them *really* thoroughly. It’s a bit of a pain to do, but worth it! Toss them with a little oil and season with salt and paprika before baking them in the oven at 200C for 10-15 minutes. Yum, yum, YUM!! Don’t burn them or they get a little bitter.
- Make the flesh into a pie and serve with too much cream. Lots of recipes on the internet already… Another YUM
- I don’t put the bleachy or Vaselined pumpkin in the food waste bin afterwards. Someone told me that goes for pig food. Which I think is not actually true, but… just in case!
Scores on the Doors
| Fun: | 10/10 |
| Nice and Easy to set up: | 1/10 |
| Not Much Mess: | 1/10 |
| Looks Good: | 10/10** |
| Not too much Fighting: | 10/10 |
| Keeps them Occupied for ages: | 5/10 |
| Not much parent help required: | 1/10 |
** depends very much on your cutting skills!
Remember, crafting with your kids is not really about making things, it’s about making memories.


0 Comments